
Salesforce shared that sellers are spending less time selling and more time on administrative tasks, like lead management. Only 28% of the week is allocated to selling, down from 34% in 2018. As the volume of data to manage increases, sales professionals get bogged down with data management work that - while important - can be draining and distracting.
With the right tools, sales professionals can get back their productivity and focus on what they do best - driving revenue.
Why Import Leads into Salesforce?
Ensuring lead data is accurate in Salesforce helps the business understand campaign performance and what actions to take.
The data is centralized and streamlines follow ups. Sellers are in a better position to nurture those leads, with insights into engagement history and the ability to personalize outreach.
Reporting is streamlined with more comprehensive data.
And lastly, ROI tracking is improved - helping sellers understand more about high-value leads and where to prioritize their focus.

Now let’s see why some businesses find it challenging to import leads into Salesforce in a timely, consistent manner.
Understanding the Current Import Process
Manually entering leads can be draining. The default lead import experience in Salesforce is manual and prone to errors that eat away at your productivity. Below is a common Salesforce import process and the errors faced by Salesforce users:
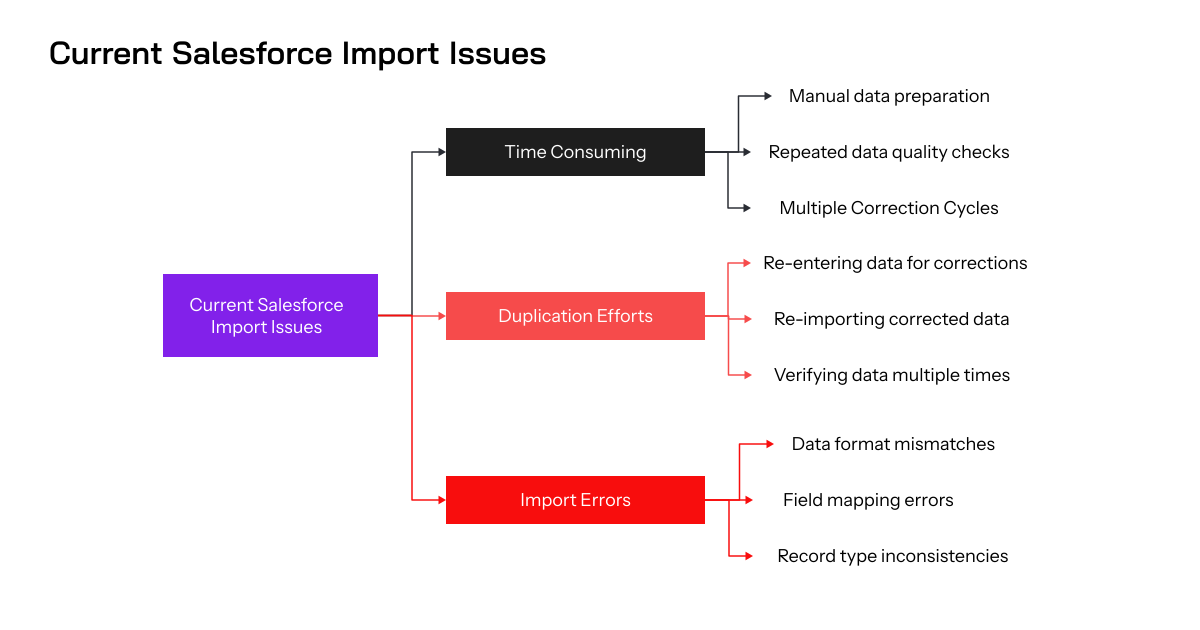
Common Salesforce lead import challenges you might face:
- Data Quality: "Dirty data" (inaccurate, incomplete, or inconsistent) can lead to import errors and hinder your sales efforts.
- Mapping Mismatches: Salesforce fields and your lead data might not align perfectly. Mismatched fields can lead to data being placed in the wrong spots, creating confusion.
- Duplicate Data: Importing leads can create duplicates in Salesforce, wasting storage space and skewing your sales pipeline.
- Formatting Issues: Salesforce requires specific file formats (CSV, Excel) and data formatting. Incorrect formatting can cause import failures.
- Missing Required Fields: Some Salesforce lead fields are mandatory. Missing this data will prevent successful import.
The above challenges are easily addressed with Valorx Wave.
Upgraded import experience in Salesforce
Demo Flow: Learn How to Import Contacts into Salesforce for Free with Valorx Wave
Using Valorx Wave Smart Import:
Follow this step-by-step guide for an improved lead import and management experience.
Step 1: Prepare Your Lead Data
- Gather Data: Compile all relevant information for the Leads you want to import. This typically includes details such as Lead Name, Company, Email, Phone, Status, and any custom fields you've set up in Salesforce.
- Format Your Data: Organize your data into a CSV or Excel file. Ensure each column clearly represents a field in Salesforce for Leads.
Step 2: Access Valorx Wave Chrome Plugin from your Browser
- Navigate to Smart Import: Click on Smart Import to initiate the import process.
Step 3: Upload Your Data
- Choose Import Option: In Valorx Wave, select the option to import data and choose your prepared file (CSV or Excel) that contains the Leads information.
- Upload and Process: Upload your file. Valorx Wave will process it and prepare it for the next steps, which include mapping and validation.
Step 4: Map Your Data
- Field Mapping: Use Valorx Wave's Smart Import and intelligent mapping features to align your data columns with the corresponding Salesforce fields for Leads. The system might automatically suggest mappings based on your file’s column names and Salesforce field names.
- Save Mappings for Future: If you foresee importing Leads regularly, save your mappings to expedite future imports, eliminating the need to remap each time.
Step 5: Preview and Edit
- Preview Your Data: Before finalizing the import, preview how your data will appear in Salesforce. This helps to catch and correct any errors or mismatches.
- Make Necessary Edits: Utilize the edit functionality to make any corrections directly within Valorx Wave’s interface, ensuring your data is accurate before import.
Step 6: Finalize Import
- Execute the Import: Once satisfied with the mapping and preview, proceed to import your Leads into Salesforce.
- Monitor Import Progress: Valorx Wave provides feedback on the import progress and any issues encountered, allowing for real-time monitoring and adjustments if necessary.
Step 7: Post-Import Actions
- Review Imported Leads: After the import, review the Leads in Salesforce to confirm that all information is correctly uploaded and displayed.
- Modify Leads: Should you need to modify any Leads, you can either update them directly in Salesforce or use Valorx Wave to make bulk updates by preparing an updated file and following a similar import process.
Get started with Valorx Wave - for Free
Valorx Wave empowers you to streamline case data management, freeing you to focus on building stronger customer relationships. Utilize Valorx Wave's intuitive smart import functionality and unlock the full potential of Salesforce's lead management capabilities. Get started for free today.